我的云音乐APP开发课程笔记
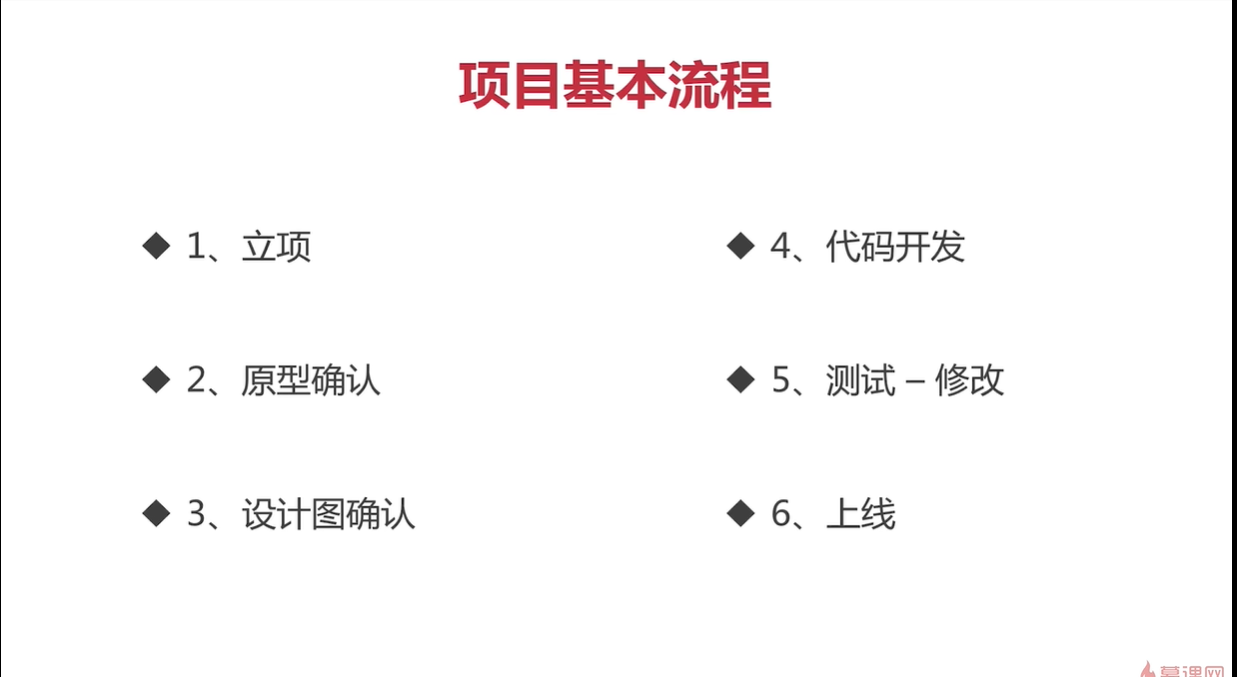
项目基本流程
第三方库
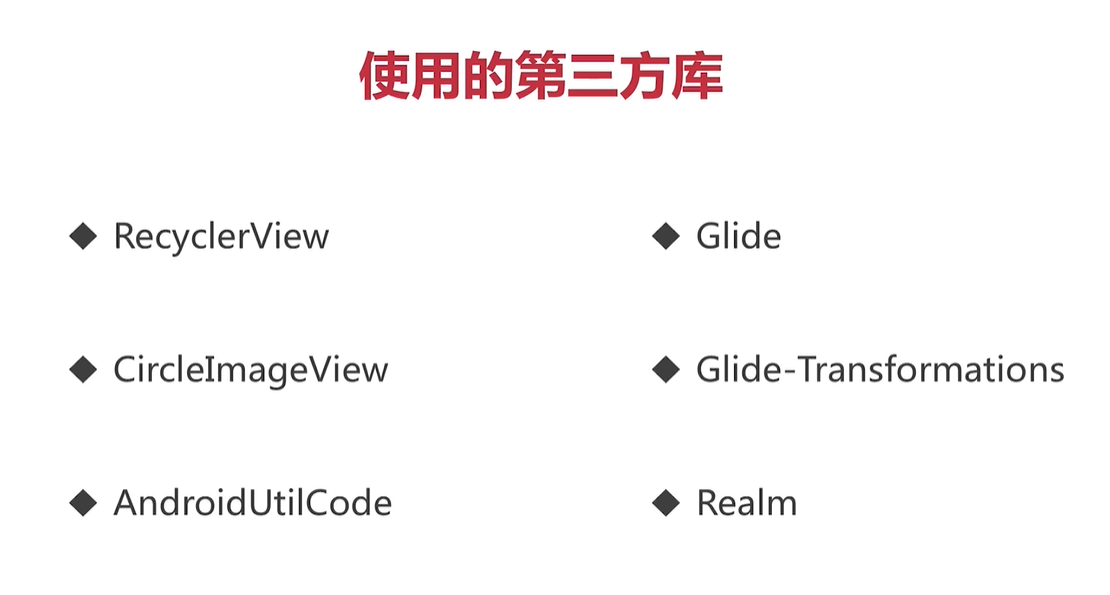
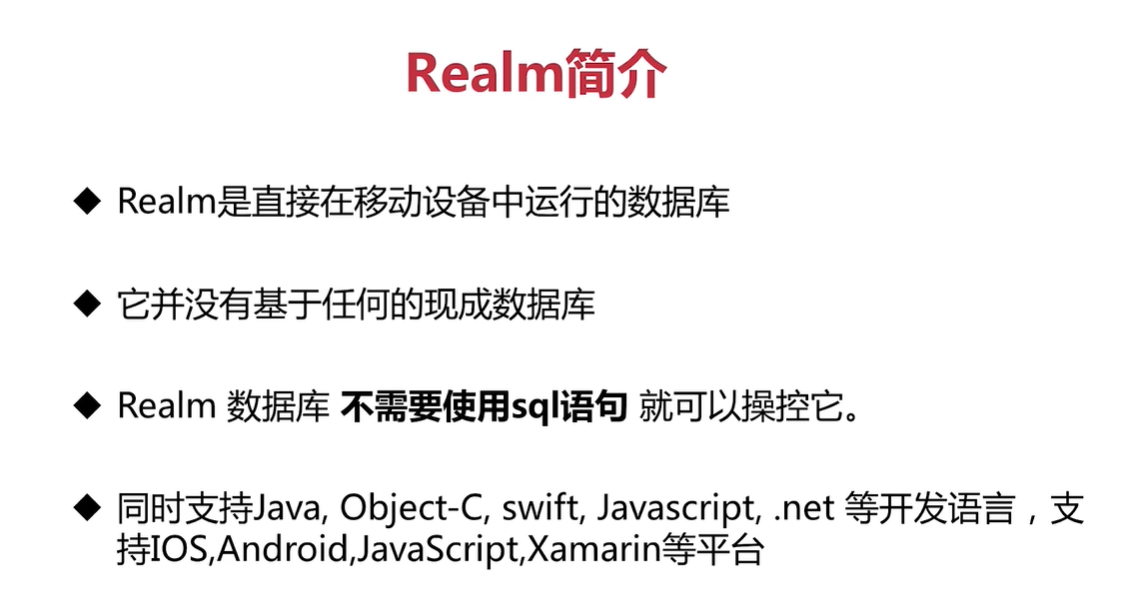
AndroidUtilCode是一个校验信息的库
Glide是在线加载图片的库
glide-transformations配合Glide进行图片处理(如高斯模糊处理
CircleImageView 把图片圆形展示并可以设置边界
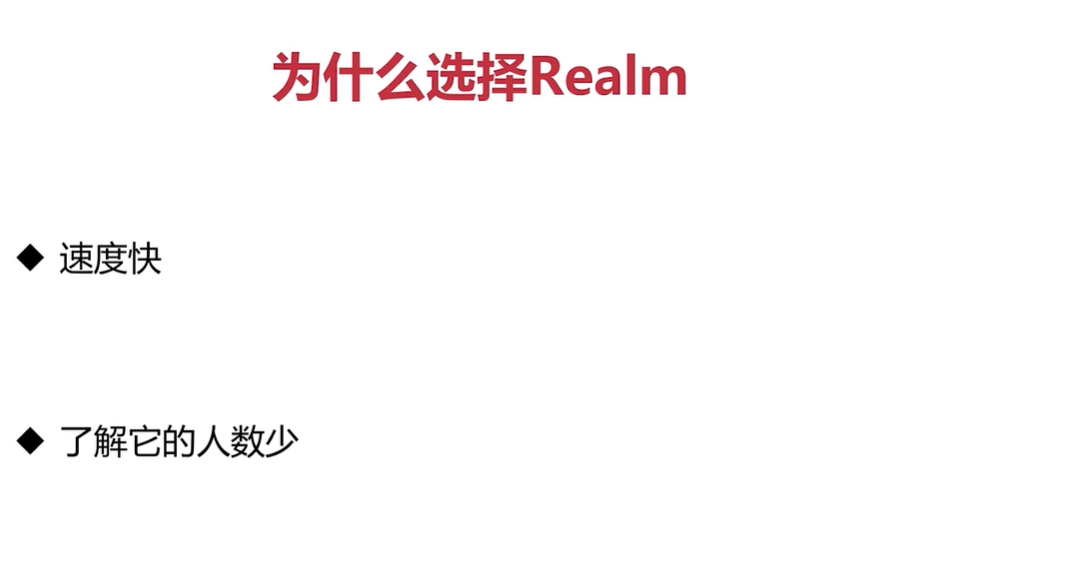
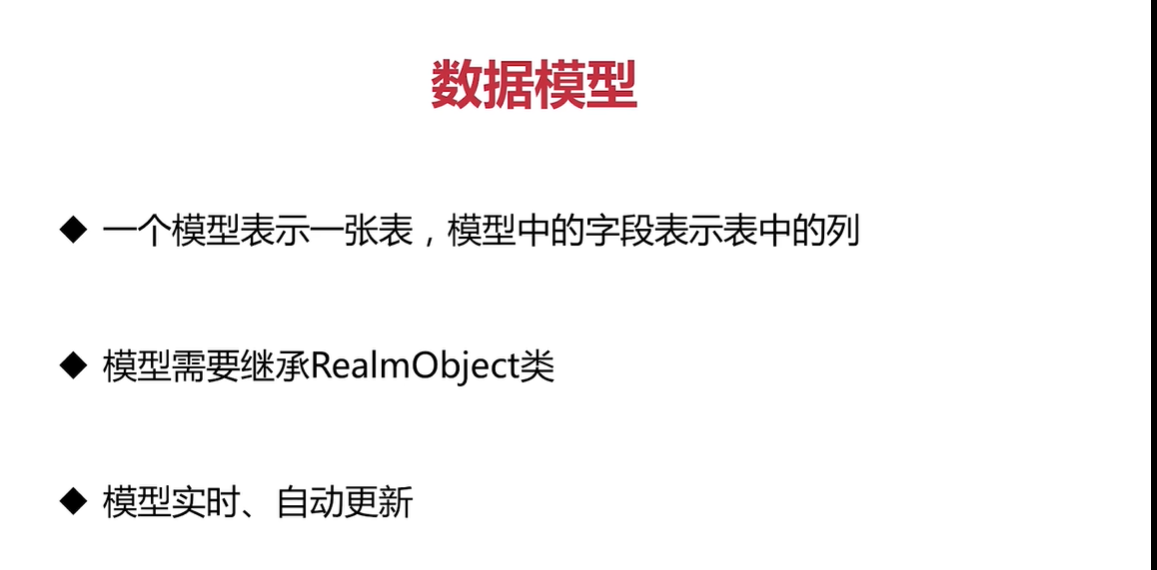
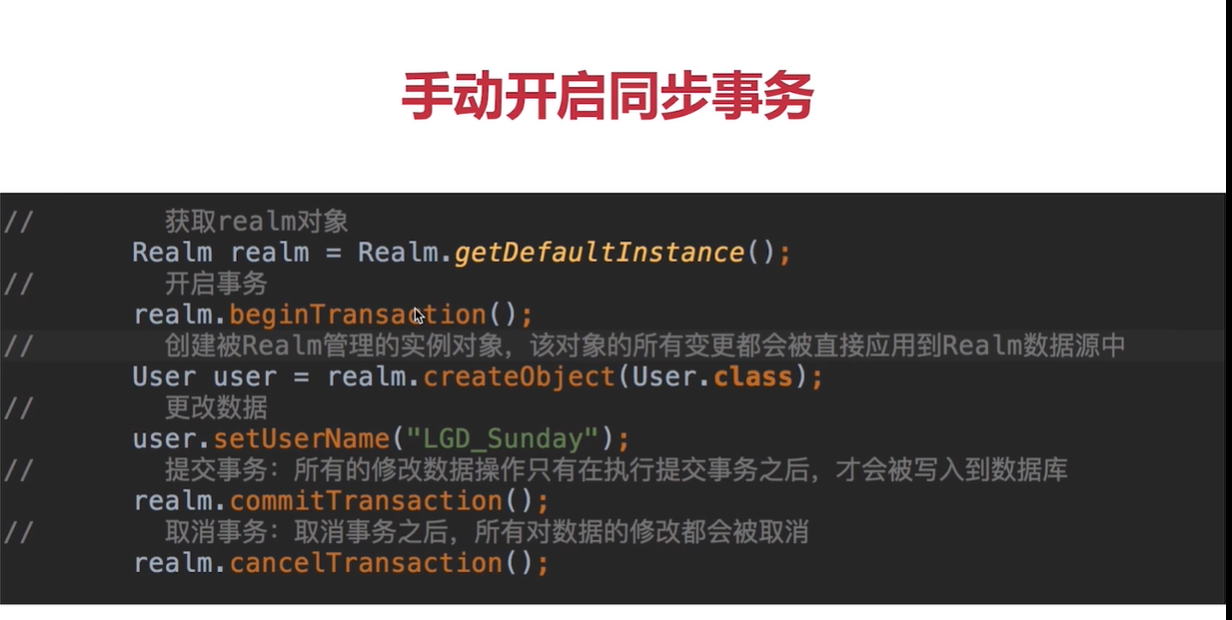
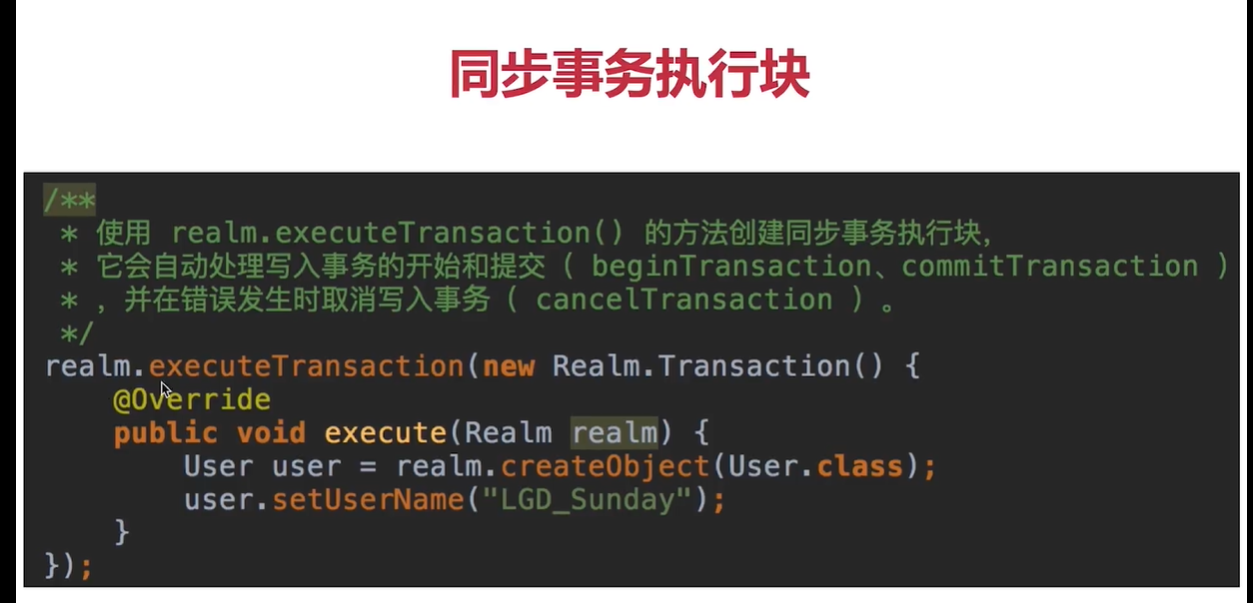
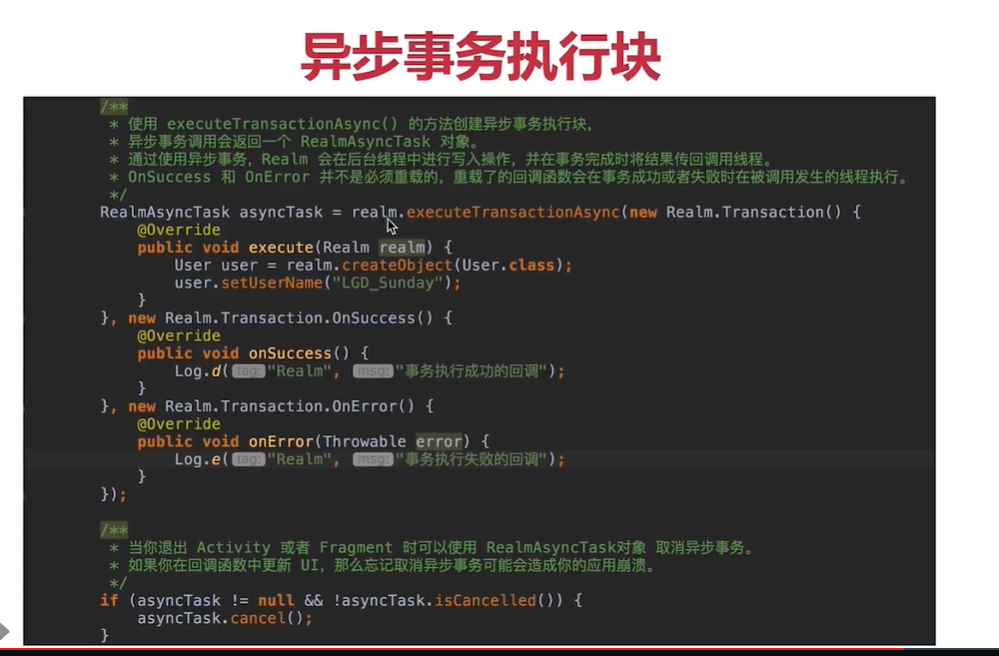
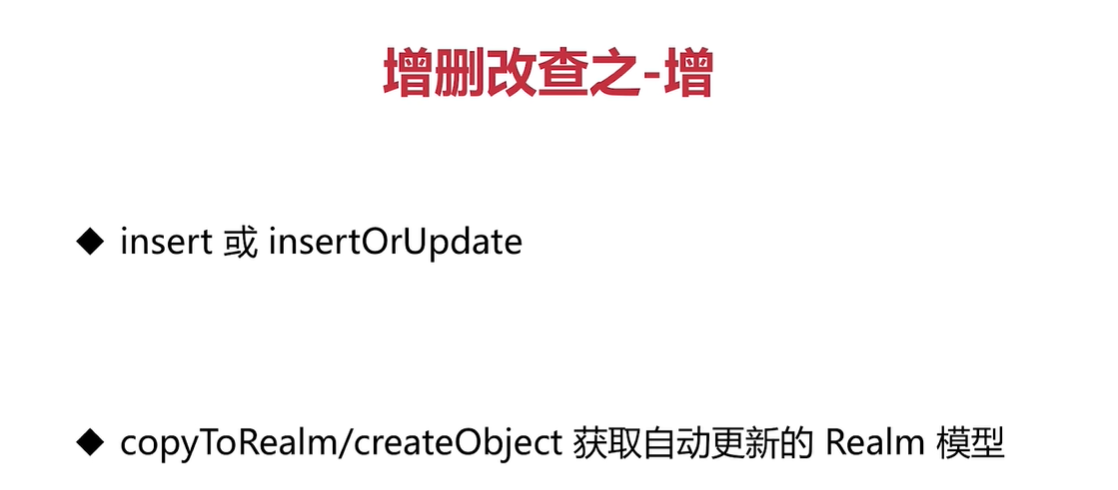
Realm数据库 的使用
EventBus 一个Android事件发布/订阅轻量级框架。(类似于广播)
- 简化了组件间的通讯。
- 分离了事件的发送者和接受者。
- 在Activity、Fragment和线程中表现良好。
- 避免了复杂的和易错的依赖关系和生命周期问题。
- 使得代码更简洁,性能更好。
- 更快,更小(约50k的jar包)。
LitePal :LitePal是一款开源的Android数据库框架,采用了对象关系映射(ORM)的模式,并将我们平时开发最常用到的一些数据库功能进行了封装,使得不用编写一行SQL语句就可以完成各种建表和增删改查的操作。
BaseRecyclerViewAdapterHelper 一个非常简单灵活且强大的adapter
导入后,在MyApplication 中初始化,模型类要继承RealmObject (在模型中描绘一个数组用RealmList)
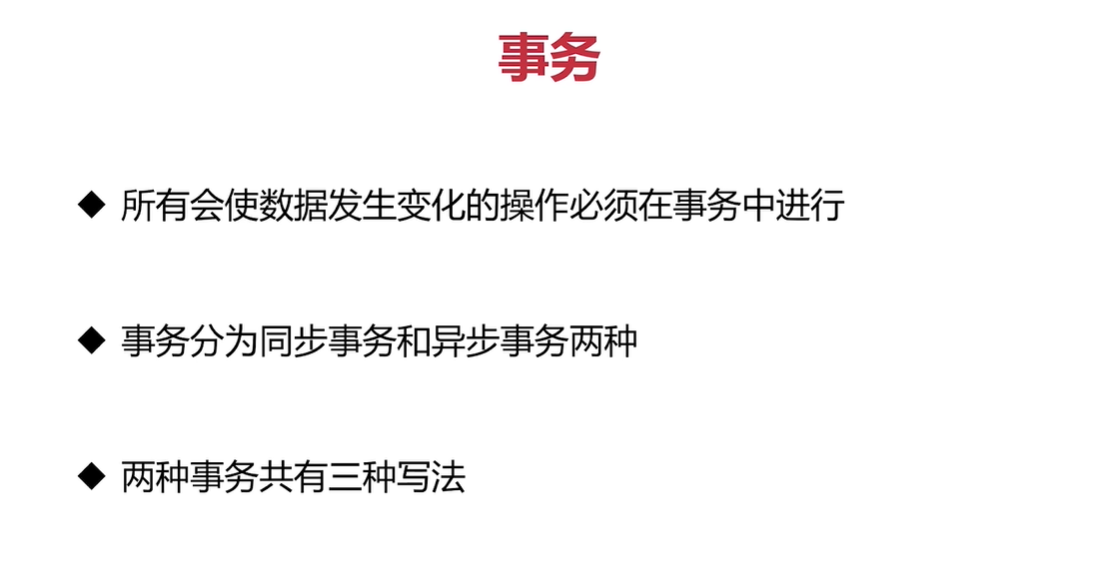
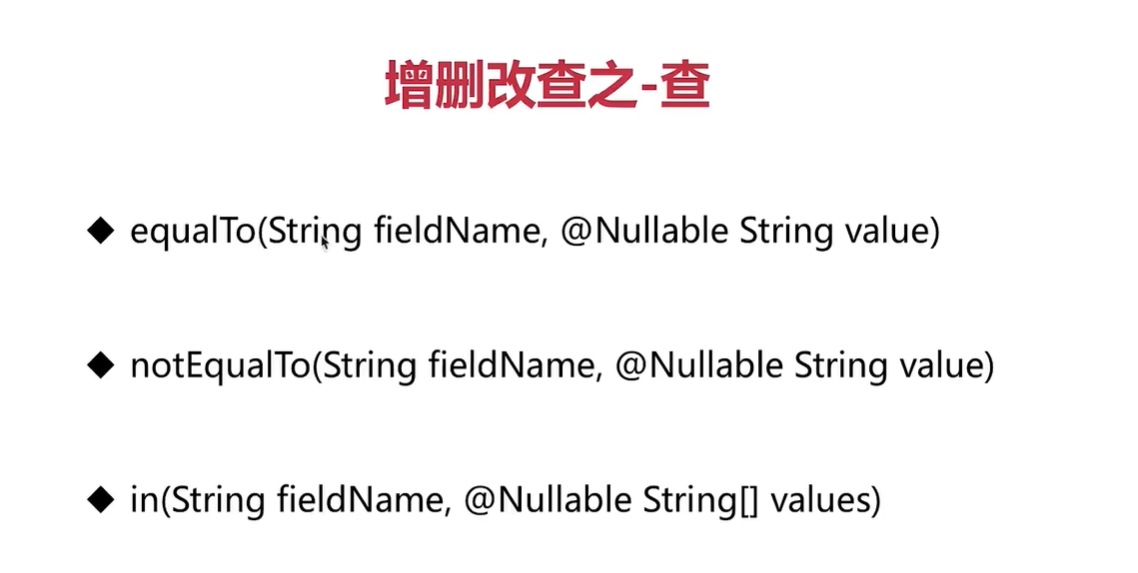
1、
2、
3、
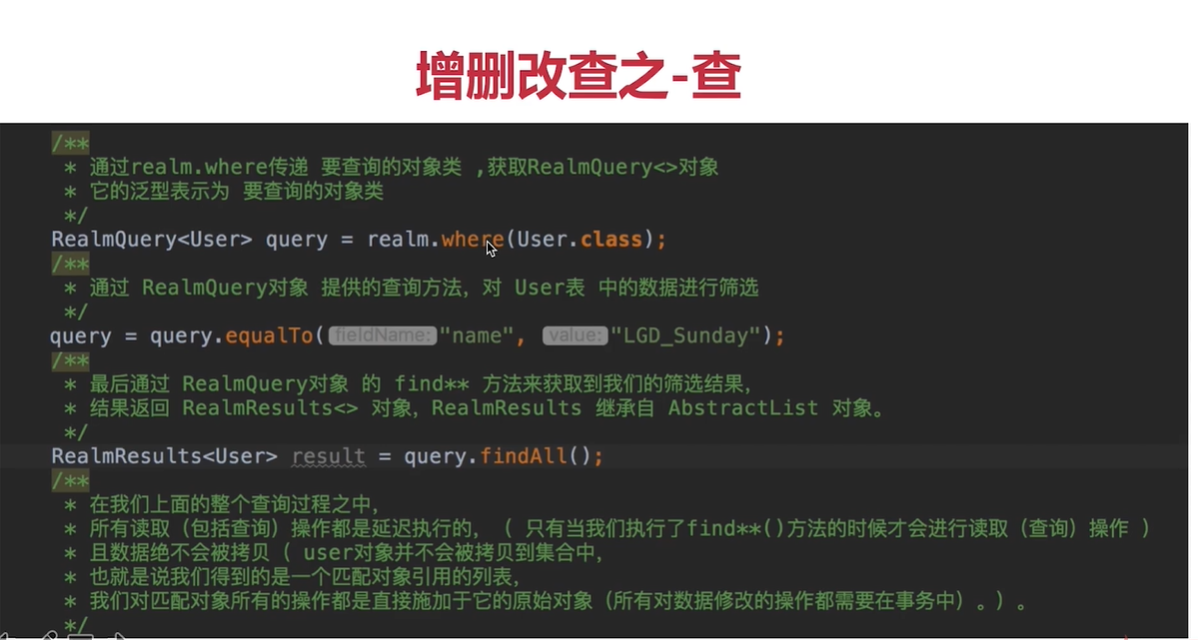
result 是可以自动更新的模型的集合
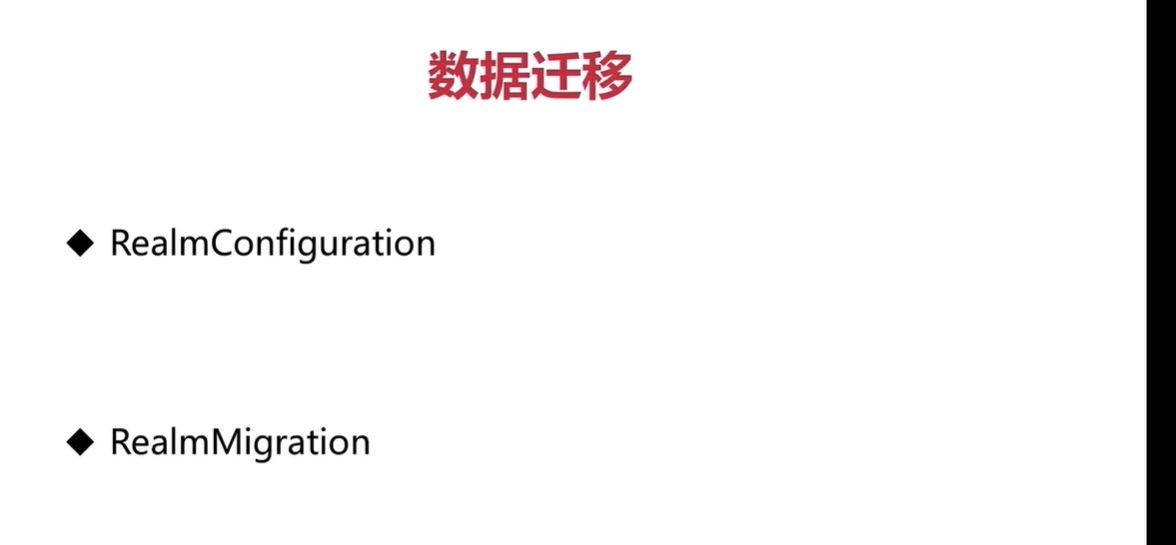
Realm数据迁移
Realm数据库发生结构性变化(模型或者模型中的字段出现了新增,修改,删除)的时候,我们就需要对数据库进行迁移
Realm数据库传的是对象引用,只有当不在使用Realm数据库中的数据时,才能close掉。
零碎的知识点
UI样式
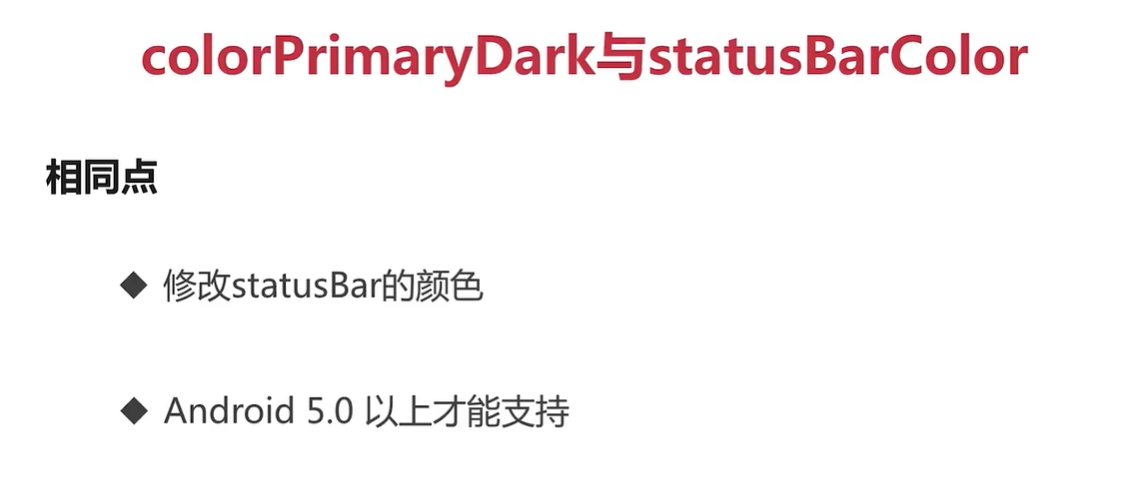
- 顶部存放状态的区域叫做statusBar,关于android中风格样式的设置都在res/value/styles.xml里
- value-v21 :存放android5.0之后的资源文件
- NavigationBar(IOS):顶部导航栏
自定义控件
现在values文件夹下建一个attrs.xml,然后声明样式,如
<?xml version="1.0" encoding="utf-8"?>
<resources>
<!--    声明样式-->
    <declare-styleable name="inputView">
<!--        输入框前图标,format:reference表示接收一个资源文件-->
        <attr name="input_icon" format="reference"/>
<!--        输入框提示内容,format="string"表示接收一个字符串-->
        <attr name="input_hint" format="string"/>
<!--        输入框是否以密文展示-->
        <attr name="input_password" format="boolean"/>
    </declare-styleable>
</resources>
创建布局xml文件,如
<?xml version="1.0" encoding="utf-8"?>
<LinearLayout xmlns:android="http://schemas.android.com/apk/res/android"
    android:orientation="horizontal"
    android:layout_width="match_parent"
    android:layout_height="@dimen/inputViewHeight"
    android:gravity="center_vertical"
    android:paddingLeft="@dimen/marginSize"

    >

    <ImageView
        android:id="@+id/iv_icon"
        android:layout_width="wrap_content"
        android:layout_height="wrap_content"
        android:src="@mipmap/phone"
        />
    <EditText
        android:id="@+id/et_input"
        android:layout_width="match_parent"
        android:layout_height="match_parent"
        android:background="@null"
        android:hint="用户名"
        android:paddingLeft="@dimen/marginSize"
        android:paddingRight="@dimen/marginSize"
        android:textSize="@dimen/titleSize"
        />
</LinearLayout>
创建相应类
package com.example.cloudmusic.views;

import android.content.Context;
import android.content.res.TypedArray;
import android.media.Image;
import android.os.Build;
import android.text.InputType;
import android.util.AttributeSet;
import android.view.LayoutInflater;
import android.view.View;
import android.widget.EditText;
import android.widget.FrameLayout;
import android.widget.ImageView;

import androidx.annotation.NonNull;
import androidx.annotation.Nullable;
import androidx.annotation.RequiresApi;

import com.example.cloudmusic.R;

/**
 * 1、input_icon: 输入框前面的图标
 * 2、input_hint: 输入框提示内容
 * 3、is_password: 输入框的内容是否需要以密文的形式展示
 */
public class InputView extends FrameLayout {

    private int inputIcon;
    private String inputHint;
    private boolean isPassword;

    private View mView;
    private ImageView mIvIcon;
    private EditText mEtInput;

    public InputView(@NonNull Context context) {
        super(context);
        init(context,null);
    }

    public InputView(@NonNull Context context, @Nullable AttributeSet attrs) {
        super(context, attrs);
        init(context,attrs);
    }

    public InputView(@NonNull Context context, @Nullable AttributeSet attrs, int defStyleAttr) {
        super(context, attrs, defStyleAttr);
        init(context,attrs);
    }

    @RequiresApi(api = Build.VERSION_CODES.LOLLIPOP)
    public InputView(@NonNull Context context, @Nullable AttributeSet attrs, int defStyleAttr, int defStyleRes) {
        super(context, attrs, defStyleAttr, defStyleRes);
        init(context,attrs);
    }
    private void init(Context context,AttributeSet attrs){
        if(attrs == null) return ;
//        获取自定义属性
        TypedArray typedArray = context.obtainStyledAttributes(attrs, R.styleable.inputView);
        inputIcon = typedArray.getResourceId(R.styleable.inputView_input_icon,R.mipmap.logo);
        inputHint = typedArray.getString(R.styleable.inputView_input_hint);
        isPassword = typedArray.getBoolean(R.styleable.inputView_input_password,false);

        //释放
        typedArray.recycle();

        //绑定layout布局
        mView = LayoutInflater.from(context).inflate(R.layout.input_view,this,false);
        mIvIcon = mView.findViewById(R.id.iv_icon);
        mEtInput = mView.findViewById(R.id.et_input);

//        布局关联属性
        mIvIcon.setImageResource(inputIcon);
        mEtInput.setHint(inputHint);
        mEtInput.setInputType(isPassword ? InputType.TYPE_CLASS_TEXT |
                InputType.TYPE_TEXT_VARIATION_PASSWORD : InputType.TYPE_CLASS_PHONE);

        addView(mView);//绑定布局

    }

    /**
     * 返回输入内容
     * @return
     */
    public String getInputStr(){
        return mEtInput.getText().toString().trim();
    }
}
最后是调用布局
<com.example.cloudmusic.views.InputView
       android:layout_width="match_parent"
       android:layout_height="@dimen/inputViewHeight"
       android:layout_marginTop="@dimen/marginSize"
       app:input_icon="@mipmap/phone"
       app:input_hint="手机号"
       app:input_password="false"
       />
样式复用方法
include引入自定义
view在
style.xml里定义一个style<!-- 分割线样式--> <style name="line"> <item name="android:layout_height">1dp</item> <item name="android:layout_width">match_parent</item> <item name="android:background">@color/lineColor</item> <item name="android:layout_margin">@dimen/marginSize</item> </style> 使用
<View
       style="@style/line"/>
按钮或者文本框点击高亮
<TextView
android:layout_width="match_parent"
android:layout_height="@dimen/itemHeight"
android:layout_marginTop="@dimen/marginSize"
android:text="修改密码"
android:textSize="@dimen/infoSize"
android:paddingLeft="@dimen/marginSize"
android:gravity="center_vertical"
android:onClick="onChangeClick"
android:background="@drawable/item_commit_select" <!--关键所在-->
/>
<Button
style="@style/commitBtn"<!--在styles.xml定义全局样式-->
android:text="退出登录"
android:layout_marginTop="@dimen/marginSize"
android:onClick="onLogoutClick"
/>
<!--styles.xml-->
<resources>
<!-- Base application theme. -->
<style name="AppTheme" parent="Theme.AppCompat.Light.DarkActionBar">
<!-- Customize your theme here. -->
<item name="colorPrimary">@color/colorPrimary</item>
<item name="colorPrimaryDark">@color/mainColor</item>
<item name="colorAccent">@color/colorAccent</item>
<item name="android:windowAnimationStyle">@style/AnimationActivity</item>
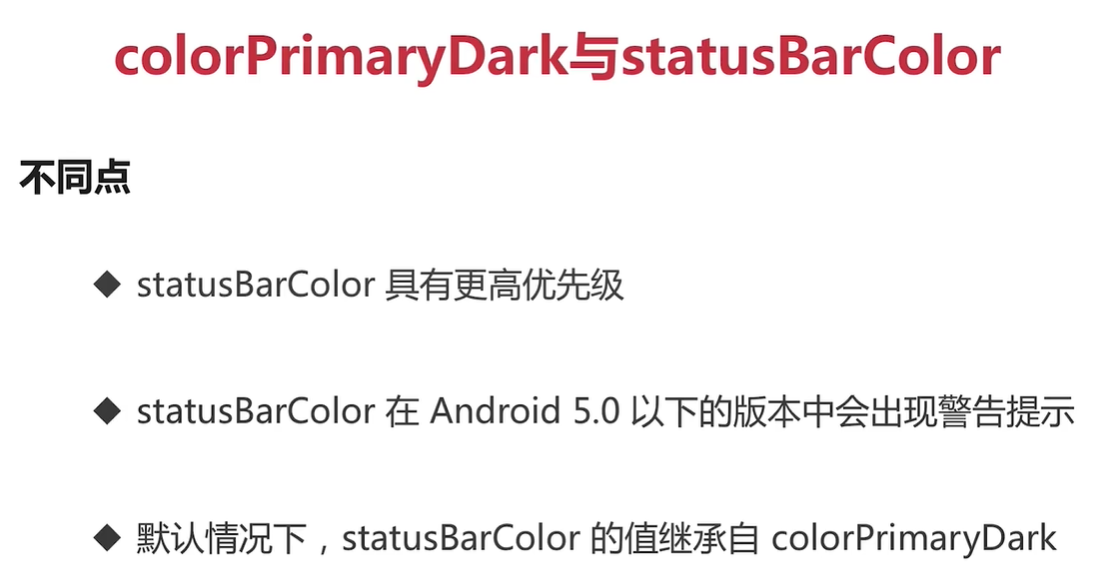
<!-- <item name="android:statusBarColor">也可以修改statusBar颜色,优先级比PrimaryDark高</item>-->
</style>
<!-- 登录按钮-->
<style name="commitBtn">
<item name="android:layout_height">@dimen/btnHeight</item>
<item name="android:layout_width">match_parent</item>
<item name="android:textColor">@android:color/white</item>
<item name="android:textSize">@dimen/titleSize</item>
<item name="android:layout_marginLeft">@dimen/marginSize</item>
<item name="android:layout_marginRight">@dimen/marginSize</item>
<item name="android:layout_gravity">center</item>
<item name="android:background">@drawable/btn_commit_select</item>
</style>
</resources>在res/drawable下创建item_commit_select.xml
<?xml version="1.0" encoding="utf-8"?>
<selector xmlns:android="http://schemas.android.com/apk/res/android">
<!--    View高亮-->
    <item android:state_focused="true" android:drawable="@drawable/commit_item_h" />
    <item android:state_pressed="true" android:drawable="@drawable/commit_item_h" />
    <item android:state_selected="true" android:drawable="@drawable/commit_item_h" />
<!--    View默认-->
    <item android:drawable="@drawable/commit_item_n"/>

</selector>
然后创建commit_item_h.xml
<?xml version="1.0" encoding="utf-8"?>
<shape xmlns:android="http://schemas.android.com/apk/res/android"
    android:shape="rectangle"
    >
<!--    实体颜色-->
    <solid android:color="@color/itemColorH"/>
<!--    弧度-->
    <corners android:radius="@dimen/radius"/>

</shape>
创建commit_item_n.xml
<?xml version="1.0" encoding="utf-8"?>
<shape xmlns:android="http://schemas.android.com/apk/res/android"
    android:shape="rectangle"
    >
<!--    实体颜色-->
    <solid android:color="@android:color/white"/>
<!--    弧度-->
    <corners android:radius="@dimen/radius"/>

</shape>
Activity 过度动画分类
定义全局动画效果
修改styles.xml中的 <style name=”AppTheme (增加
<item name="android:windowAnimationStyle">@style/AnimationActivity</item>),记得如果创建了values-v21文件下,就要更新下其下的styles.xml在styles.xml中增加活动动画样式
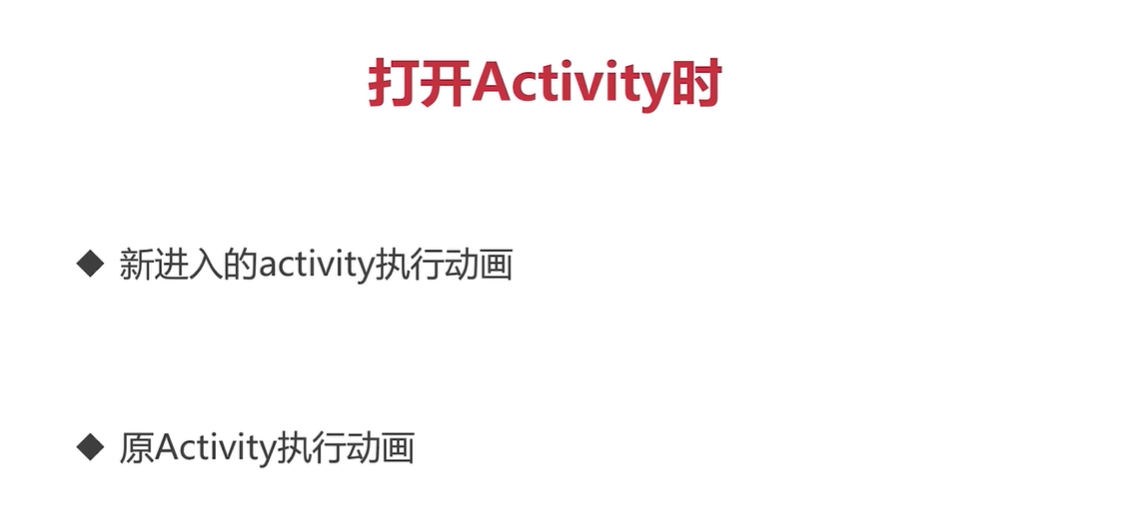
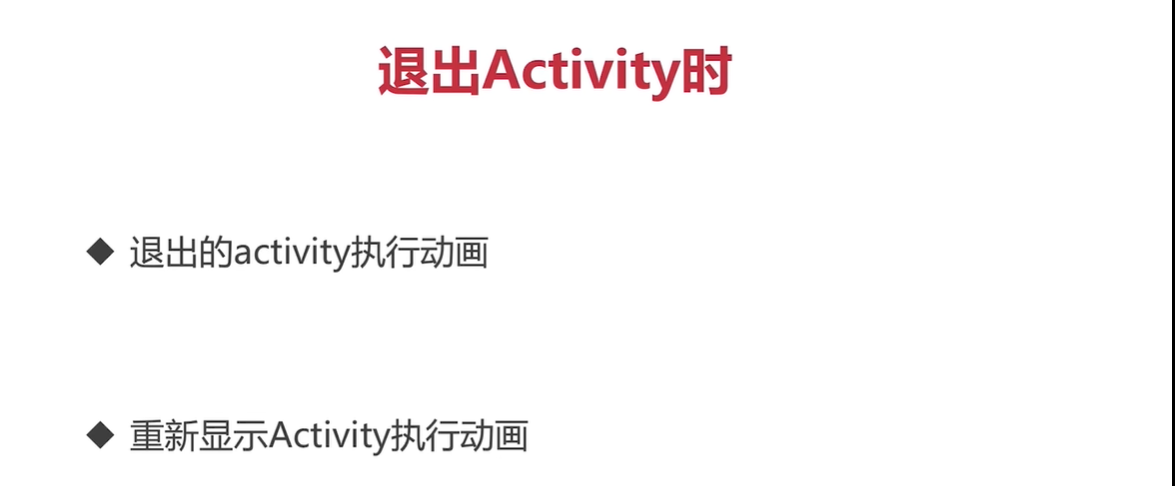
<style name="AnimationActivity" parent="@android:style/Animation.Activity">
<!--        描述四个动画效果-->
        <!--打开Activity时,新进入的activity执行的动画(接受一个动画资源文件)-->
        <item name="android:activityOpenEnterAnimation">@anim/open_enter</item>
        <!--打开Activity时,原Activity执行的动画-->
        <item name="android:activityOpenExitAnimation">@anim/open_exit</item>
        <!--退出Activity时,退出的Activity执行动画 -->
        <item name="android:activityCloseExitAnimation">@anim/close_exit</item>
        <!--退出Activity时,重新显示的Activity执行动画 -->
        <item name="android:activityCloseEnterAnimation">@anim/close_enter</item>
    </style>
在res下添加文件夹
anim,然后在anim文件夹下,新建四个动画资源文件<!--open_enter.xml--> <?xml version="1.0" encoding="utf-8"?> <set xmlns:android="http://schemas.android.com/apk/res/android"> <!-- 从右向左的动画--> <translate android:fromXDelta="100%" android:toXDelta="0%" android:duration="@integer/anim_duration" /> </set> <!--open_exit.xml--> <?xml version="1.0" encoding="utf-8"?> <set xmlns:android="http://schemas.android.com/apk/res/android"> <!-- 以中心为源点缩放--> <scale android:fromXScale="1.0dp" android:fromYScale="1.0dp" android:toXScale="0.8dp" android:toYScale="0.8dp" android:duration="@integer/anim_duration" /> </set> <!--close_exit.xml--> <?xml version="1.0" encoding="utf-8"?> <set xmlns:android="http://schemas.android.com/apk/res/android"> <translate android:fromXDelta="0%" android:toXDelta="100%" android:duration="@integer/anim_duration" /> </set> <!--close_enter.xml--> <?xml version="1.0" encoding="utf-8"?> <set xmlns:android="http://schemas.android.com/apk/res/android"> <scale android:fromXScale="0.8dp" android:fromYScale="0.8dp" android:toXScale="1.0dp" android:toYScale="1.0dp" android:duration="@integer/anim_duration" /> </set>
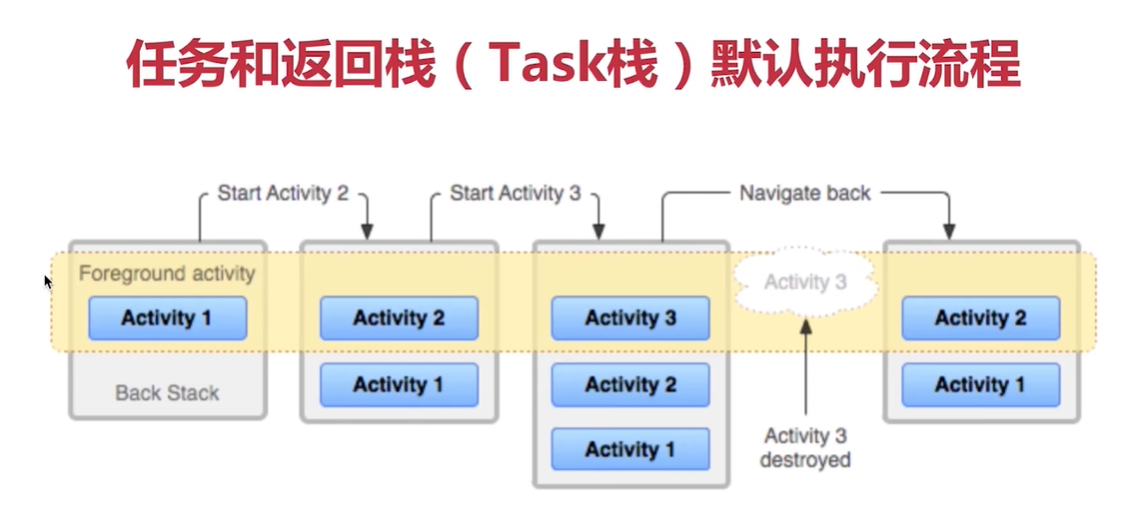
任务和返回栈(Task栈)
理解运行原理
如果理解系统运行的原理,一些看似很复杂的功能可能很简单的就能够实现了。
如,使得ImageView宽和高相同(重写onMeasure,并使得super参数相同,都为widthMeasureSpec)
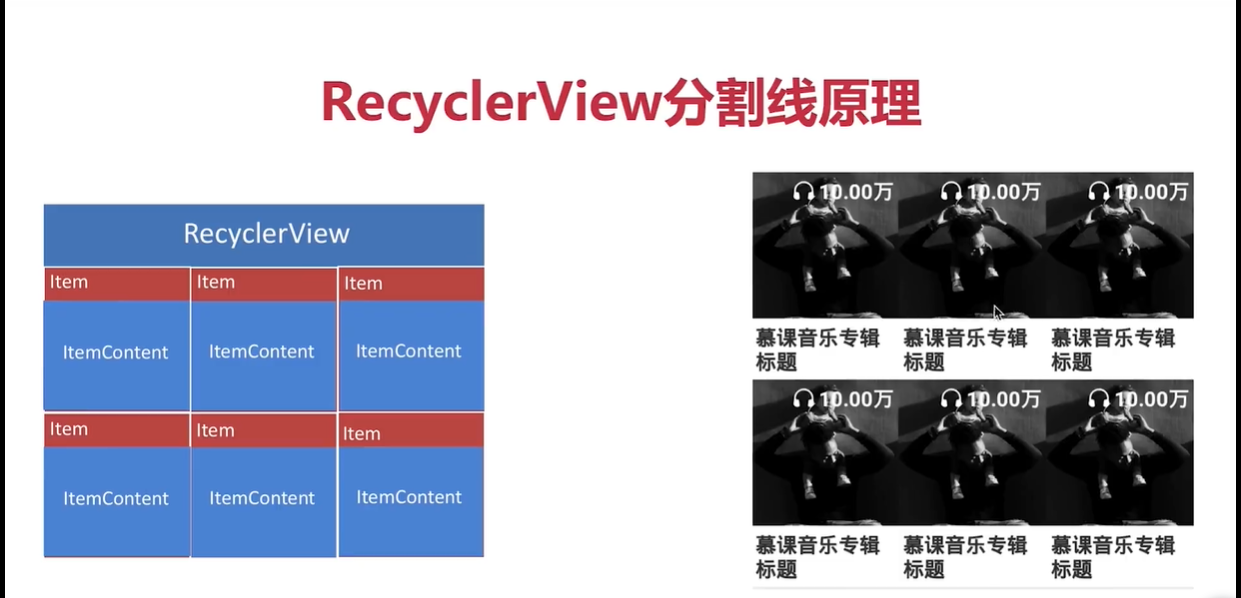
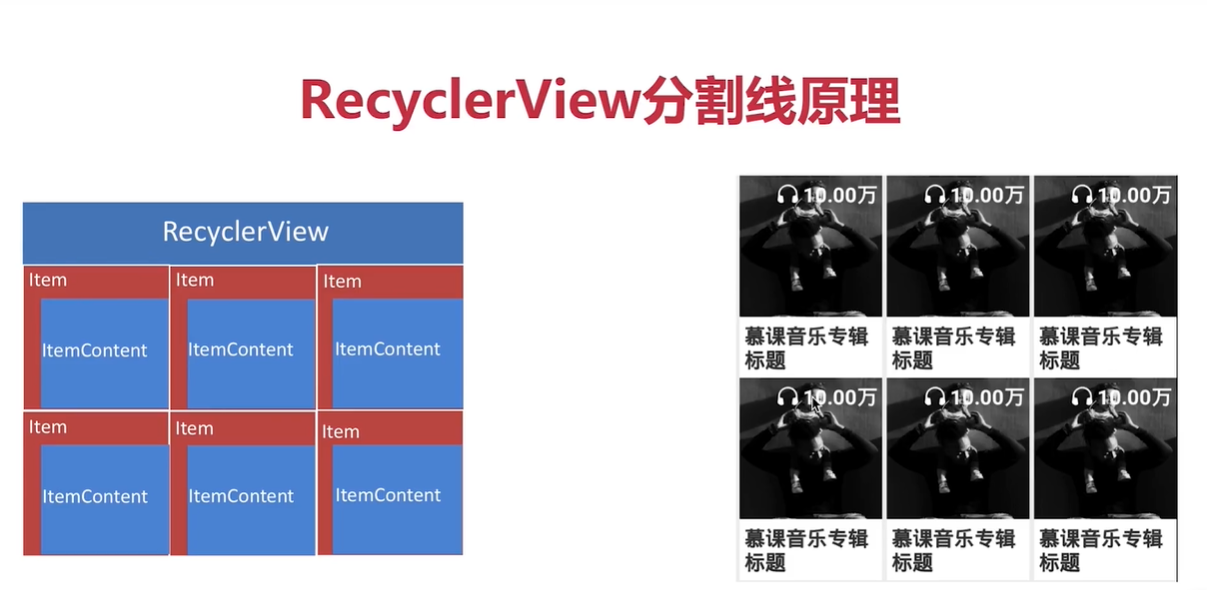
RecycleView分割线原理
通过Service 播放音乐
Android项目常见用法
创建MyApplication继承自Application,并且在AndroidManifest.xml中加入android:name=”MyApplication”
创建BaseActivity 继承自Activity,并且让所有活动继承它,方便管理活动生命周期
使用Timer进程初始页的等待及跳转
    /**
     * 初始化 ,睡眠3s
     */
    private void init() {
        mTimer = new Timer();
        mTimer.schedule(new TimerTask() {
            @Override
            public void run() {
//                Log.e("WelcomeActivity","当前线程为" + Thread.currentThread());
                toLogin();//跳转到登录页
            }
        },3*1000);
    }
ScrollView 和 RecyclerView一起使用时,自定义RecyclerView高度
利用Android提供的startAnimation来自定义动画
MediaPlayer来播放音乐
自动登录状态(利用SharedPreferences)
总结
疑问/待开发
- 怎么样使得圆盘静止的时候保持现状
- 上一首和下一首和暂停
- 通知栏仿照网易云
- 后台搭建